Hello all!
School is about to begin, (or already has for some of you) and we came up with a list of 10 Things to Do Before School Starts!
10. Go thrifting for a new backpack!
9. Draw a picture with colorful markers to put in your binder!
8. Use our Rainbow Notebook Tutorialto jazz up some journals!
7. Make a chain with your name on it (or anything else, ex. peace, create, school mascot) out of letter beads to hang on your backpack !
6. Super fun book cover tutorial made from shopping bags! This one is definitely on our never ending to do list!
5. Invite over some friends and have a back to school party!
4. This lunch survey is really cool, and seems handy!
3. Make cookies shaped like school buses, apples, pencils, anything school related for when every gets home!
2. Make a Back to School countdown on a chalkboard or dry erase board!
1. HAVE FUN!
Enjoy!

8.09.2011
5.20.2011
Woah....We Haven't Posted in Forever!!
Sorry about not posting for a while, I guess we are just busy girls!!
So, today for you we have some projects that we haven't done yet but are on our "To-Do" list! These are some pretty great tutorials, projects, and patterns that we just haven't had the time for, but will be definitely doing in the near future!! Enjoy!

This would make a pretty funny gag gift!

Cute, huh? Found here

I'm thinking of making this lunchbox in polka dot :)

These shoes are super cute!!!!!
 I am dying to make this pouf for my craft room!
And this amazing skirt is perfect for summer! Plus, the deep pockets rock!!!
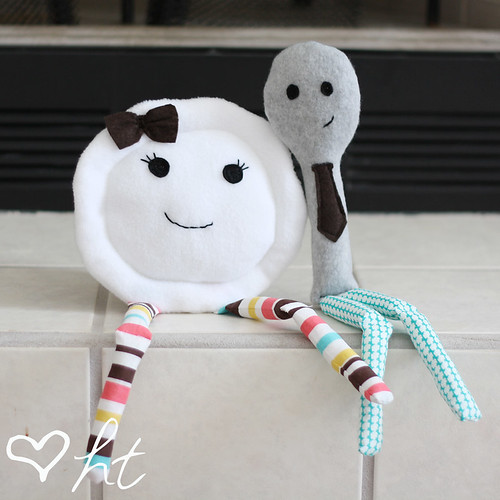
And last but certainly not least, some adorable softies from Grosgrain's FREE PATTERN MONTH!!!!
Well, that's all for today, folks! See you next time, on Those Crafty Chicks!
*Note: This is not our entire "To-Do" list, it would be incredibly time consuming and tiring to post every single item on this list, so we chose some of our favorites!

4.16.2011
Easter Crafts!
Hey guys! Easter is only 1 week away, so we thought we better start posting some crafts. Enjoy!
Crispy Bunny Treats

Bunny Pal Softie

How to Dye Eggs with Kool-Aid


Crispy Bunny Treats
Bunny Pal Softie

How to Dye Eggs with Kool-Aid

More crafts soon to come!
See ya!
3.30.2011
Thanks!
Hello! We've just reached 10 followers! Yayyyy!
It's not much, but we're getting there... Any blogging tips are welcome.
So thank you to our 10 followers, and make sure to spread the word. On another note, we'll have Easter Crafts coming soon. We are also going to try to post more, right now we post maybe once every 1 or 2 weeks, but we'd like to post every week!
See ya soon, and happy crafting!
3.22.2011
Polka Dotted Pinafore

Also, for the first time in Those Crafty Chicks history, we did our first photo shoot! It was a little cold outside, but we made it through and got some really cool pictures. Thanks for modeling Lindsey! If you want to see all of them, we'll have a "Photos" section coming soon.
Let's get started!
You need:
1 or 1.5 yards of fabric (depending on your size; this skirt was made for a 12 year old girl.)
Zipper
Fabric Glue
Scissors
Iron
Sewing stuff
First, measure your waist, and add about 10 inches. This is measurement A.
Now measure from your waist to wherever you want the skirt to end and add 1 inch. This is measurement B.
You might need a friend to help you with this one! Measure from your waist, up to your shoulder, and down your back until you get to where your waist is. Add an inch and this is measurement C.
OK, now cut all your pieces out as shown below. The length of the waistband is the measurement of your waist, plus 1 inch.

Fold the waistband in half longways making sure the right sides of the fabric are touching and sew into a tube. Then, Line up the short edges of the waistband with the edges of the skirt and pin the short edges down. Now pin the middle down. Now pin in between those pins, and so on and so on until it looks like this. The waistband is under the skirt. If that didn't make sense, use this tutorial.

Sew the band to the skirt. Next, you sew the straps into a tube the same way you did with the waistband. Turn them right side out.
Sew your zipper into the skirt. If you're not sure how to do this, Sew Mama Sew has a great tutorial on installing a zipper.
Mark where you want the straps and sew them on. Now you have a pretty little pinafore!
As always, send us pic or leave us a comment if you make one!
3.02.2011
Tie Snake

Isn't it adorable?? This is a no sew project, all you need is a tie, felt, and hot glue. We found the tutorial at A Girl and A Glue Gun. Check it out!
Click here for the tutorial!
P.S. Stay tuned for one of our tutorials, here's a sneak peek!

2.21.2011
Zipper Flower Headband
Hello! A couple of weeks ago, as we were surfing the web, we found an awesome tutorial for a cute headband.. made from a zipper! It came from one of our favorite blogs, Craftaholics Anonymous.
We loved it so much, we decided to make our own.
If you want to make your own, click here for the tutorial.
Here's Linda's:

And here's ours: We liked them so much, we made 2!


See ya!
2.13.2011
Valentine's Day!


Hey guys! Happy early Valentine's Day! This year we got a little bit of a late start on the crafts, but have 2 mini tutorials to make it up to you! First, a cute softie - a heart with wings.

To make this softie, just cut out 2 heart shapes from pink felt,

Sew them together, leaving 2 one inch spaces on the sides,

Then turn it right side out and stuff! For the wings, cut 2 wing shapes from white felt, and hot glue them into the heart.

And that's it!
For our second tutorial, we have these super cute paint chip earrings!

First, you need a pink/red paint chip, either 3 different colors or the kind that already has 3 on them.

Cut them into strips by color and overlap them like in the picture.

Glue them together with a glue stick, then cut out 2 heart shapes. Coat them with Mod Podge Dimensional Magic, let dry for 24 hours (or be impaitent and blow a fan on them for 1 hour :))
When they're dry, hot glue earring backs to the back! Tadaaaa!!

Enjoy your Valentine's Day!
Linking to:

2.08.2011
Rainbow Notebook Tutorial
Everyone has boring old black and white marble composition books, right? You can use them for school, work, or even crafting! :) Well, today we'll show you how to turn those boring notebooks into this super awesome rainbow notebook!


It's got spunk, it's got personality, it's got style! And you can make it!
All you need is a black and white marble composition notebook (they sell them really cheap at the dollar store) and Sharpies in red, orange, yellow, green, blue, and purple.
Let's get started!
First you want to divide your notebook into even sections to color. Use the picture below and mark the lines on your notebook with a pen or pencil.

Now, just color in between the lines starting with red at the top then following the rainbow all the way down the composition notebook.
That's it! You can also do the back, but we chose just to do the front. It would also look cool if the colors were in reverse order, or maybe the stripes were smaller.
If you try it, make sure to send us a picture at thosecraftychicks(at)yahoo(dot)com!
Oh, and one last thing. Doesn't the notebook look cool in the Neon effect from Picnik?

1.26.2011
SO SO SO CUTE!!

We L-O-V-E this tutorial! It's pretty easy and the outcome is absolutely fabulous. I'm giving Hootie as a birthday present (hence the ribbon on its leg) and I'm sure the recipient will adore it.
 |
| Messing around with camera settings :) |
Ribbon Headband Tutorial
Hey crafters! It's Jillian, and today I'll show you how to make that cute headband right down there.


2. Wrap the ribbon around your hand about 20 - 3- times then cut the end. (And try not to cut off your circulation!)

3. Cut a piece of ribbon about 4 inches of the spool.

4. Take the wrapped ribbon off your hand and hold it taut with your thumb and first finger. Then tie the 4 inch piece of ribbon tightly around the ribbon.

5. Take the ribbon of your fingers, and cut the ends open.

Now spread out the pieces until you have something that looks like this.

OK, for this next part, you might notice that the color of the ribbon has changed. I changed it because after I made the first ribbon bow, I found out that I had no more red ribbon! For the most part though, I would keep the colors the same.
Take the end of the ribbon and hot glue it to the end of the headband.

Now wrap the headband in ribbon, hot gluing every inch or so to keep it in place.

When you have wrapped the whole thing, glue the ribbon bow on to the headband, off to the side, and there you go! This headband would look cute in alternating colors, in red or pink for Valentine's Day, or in school colors!
See ya!

Materials:
- 1 spool of ribbon in any color
- Hot glue gun
- Scissors
- A headband

2. Wrap the ribbon around your hand about 20 - 3- times then cut the end. (And try not to cut off your circulation!)

3. Cut a piece of ribbon about 4 inches of the spool.

4. Take the wrapped ribbon off your hand and hold it taut with your thumb and first finger. Then tie the 4 inch piece of ribbon tightly around the ribbon.

5. Take the ribbon of your fingers, and cut the ends open.

Now spread out the pieces until you have something that looks like this.

OK, for this next part, you might notice that the color of the ribbon has changed. I changed it because after I made the first ribbon bow, I found out that I had no more red ribbon! For the most part though, I would keep the colors the same.
Take the end of the ribbon and hot glue it to the end of the headband.

Now wrap the headband in ribbon, hot gluing every inch or so to keep it in place.

When you have wrapped the whole thing, glue the ribbon bow on to the headband, off to the side, and there you go! This headband would look cute in alternating colors, in red or pink for Valentine's Day, or in school colors!
1.17.2011
Paper Bag Skirt Tutorial
Hello, hello, hello! And happy (belated) new year! First project of 2011:


Sew the casing shut.
Now it's time to make the sash! You don't have to make this sash, you could always just wear it with a belt, but this way the belt is guaranteed to match!
Put the skirt on. Measure your waist wearing the skirt and add 10 inches for the tie tails.
I don't have an exact pattern for this part but cut 2 strips of fabric- waist measurement + 10 by about 2 inches wide. Make the ends slanted.


Materials:
Fabric- 1/2 - 1 yard
Scissors
1/4 - 1 inch elastic
Iron
Pencil
Sewing stuff
First, measure your natural waist, not your hips. Subtract 4 or 5 inches. This is measurement W.
Now measure from your waist to where you want the skirt to end. OK, now figure out how tall you want the little above waist piece to be, then double that. If you have no idea what I'm talking about, it's the thing above the belt/sash. Add an inch for the hem. This is measurement L.
Example:
Waist: 29 - 4 = 25 = W
Desired length: 14 + 8 (4 inch top piece doubled) = 22 + 1 (hem) = 23 = L
Sorry if that was confusing just email us if you have questions.
Cut 2 pieces of fabric, W by L

Right sides facing, sew the L sides together so you have a pretty big tube.

Remeber when you figured out how big you wanted the top piece to be? Take that measurement and fold it over. (4 inches in this picture.)
Sew a seam at the bottom of the folded edge, making sure to leave an inch open for the elastic.

Now sew a seam 1 inch above the seam you just sewed, again leaving about an inch open.

Attach a safety pin to the front and back ends of the elastic. On the back end, also safety pin it to the edge of the fabric. On the front end, use it to push the elastic through the casing you made. When it reaches the point you started at, pin the 2 ends together and sew them together.

Sew the casing shut.
Now it's time to make the sash! You don't have to make this sash, you could always just wear it with a belt, but this way the belt is guaranteed to match!
Put the skirt on. Measure your waist wearing the skirt and add 10 inches for the tie tails.
I don't have an exact pattern for this part but cut 2 strips of fabric- waist measurement + 10 by about 2 inches wide. Make the ends slanted.

Sew 3 sides together, leaving one short end open. Turn it right side out then fold the short end over and sew it shut. You can iron it if you want.

Lastly, hem the skirt. I used a zig zag stich, just to make it super cute.

And there you have it! A somewhat easy fun to make and to wear paper bag skirt! You might have to wait 'till spring to wear it though...
As always, send us a pic if you make one, and enjoy!
Subscribe to:
Posts (Atom)